Rolljordan Frog Paint Scheme

22 11 2009

G’day again,

Twice in one day! If you didn’t know me any better, you’d think I was a teacher with reports to do! πŸ˜‰ (which is true – it is always my most productive part of the year for everything but reports! πŸ˜€ )

Here is the paint scheme I am going with for my Rolljordan Frogs. The bulkier frogs will be a darker green of course.

He will be used for three different games: Nuthin’ But Net (Kermitian), Elfball (Sarcos) and Blood Bowl (Slaan).

In all three games he plays for “The Swamp’s Chorus”.

He was very fun to paint and the sculpting is outstanding. Really enjoyable figure.

Cheers,
Ben.

Nuthin’ But Net and Elball can both be found at: www.impactminiatures.com

Blood Bowl can be found at: www.games-workshop.com in the specialist games section.


Compies, Teddies and Triffids Oh My!

19 09 2008

Well, that was one hectic week at work. The last week of Term 3 at our school is always Planning Week. This means that you get one day to plan with your grade level what you’re going to do for the next term. The specialists take your grade for the day, which is fine… you go out for lunch, grab books from the library, type up unnessessary planning documents etcetera πŸ™‚ … but then for the rest of the week, you have no time off…. all I can say is I’m glad it’s now holidays! So after spending four hours between yesterday and today on doing a paper animation of the life cycle of a frog (for a competition), I can spend my energies in other ways.

Despite the hectic week, I still found some downtime to unwind and paint some models.

I began painting up some little Compsognathus’ that I bought from the Honourable Lead Boiler Suit Company. Very nice little models that paint up quickly. Here is the colour scheme that I decided on. I have based them on small washers, as the normal 25mm bases looked a bit silly under them. I have about 20 of these little guys that are going to try and swarm all that come into their territory. I will be using them for my Lost Worlds games using the Rattrap Productions engine.

Speaking of the Rattrap Productions engine, I also painted up a Rouke’s Picnic Teddy (from Eureka Miniatures) to go up against these little guys. ‘Sir William Cuddlesburry’ will of course need some jolly friends to adventure with, and I simply LOVE the miniatures in this line, so they won’t be too far off I dare say old chaps. πŸ™‚

I also had the chance to paint some more Triffids during the course of the week. Here is an example of another pose of the Wargames Supply Dump Carnivorous Plant line.

After picking up some new paints (due to the drying out of some old ones) I decided to try another paint scheme for my 15mm Frogfolk models (as I found some hiding away in my model drawers). I actually really like the darker coloured greens and have decided that these vicious frogs will be savages or tribal hunters. With the new Mighty Armies Fantasy playtest underway in earnest, I will be statting these guys out to reflect this. (I just noticed that I may have to touch up the base a bit… whoops)

With the new Song of Blades and Heroes supplement (Song of Wind and Water) out, I decided to add to my Warrior Frog warband. I tried a different colour scheme for his shell which I quite liked… my g/f says she prefers the other one, but this one’s “Ok I guess”. πŸ™‚

The next models I painted were quite by accident. Not that I slipped and on the way down my paintbrush hit them, but it was raining and cold and I had run out of black undercoat. The only models that were already undercoated were some Night Goblins, so I painted them up. I thought I could use them in either SoBH or, along with the Warrior Frogs (which I have affectionately called Kermitians), I could use them for Broadsword Adventures.

And last but not least, before starting on the new Siringit team that I bought from Impact Miniatures (which I’m scared to paint because they are so cool and I don’t know where to start), I thought I would paint up my Halfling Fantasy Football team that has sat in my cupboard for far too long. They are cute little models which paint up pretty quickly. I’m fairly happy with the colour scheme (which was based off the New York Knicks) It did highlight to me however, that I need to buy some more skin coloured paint. The stuff I have at the moment is drying up fast and as a consequence, really doesn’t go on very smoothly.

In addition to all that I was even able to get in a few playtest sessions of my first game that will hopefully see a public release by the end of the year… more on that when we’re further along. πŸ™‚

Well, that was my week. I always try to have goals within my projects, progressively painting a few miniatures from this project and a few from that one to keep it all fresh. So I hope you can all see a slow progression throughout these projects. But as everyone is familiar with, sometimes something comes up that I get the urge to paint (or I get the courage to paint something that has been mocking me on my painting desk for months!) So I hope this blog doesn’t feel to ‘bitsy’ but more like a natural progression through my thinking and working process.

Anyways, I’ll leave it at that for this week and I hope you enjoyed this entry. So until next time, take care!

– Ben.


Finished Blood Bowl 7s Board! New photos for MA and Man O War

11 07 2008

Blood Bowl 7s board finished!

Well, I’ve finally finished it! It has been alot of work over the past few weeks, but I have really enjoyed chipping away at it. You can check out some more photos here. You can click on the photos to make them larger! πŸ™‚

In retrospect, I’m glad that I took my time on it as I think it may have been a bit of an overload if I had tried to get it done all in two or three sittings.

I have learnt alot of new techniques throughout the project and would reccommend that anyone that loves Blood Bowl and likes to dabble in terrain building, should give this a go! πŸ™‚

New photos of Mighty Armies units

I’ve been busy painting since it’s been very cold and rainy the last few days and have got a few more bases done. I also found some spare 15mm Frogs from East Riding Miniatures and decided to base them up for Mighty Armies.

For my 28mm MA, I have added a photo of a Warrior Frog Heroic Spearmen unit. For 15mm MA, I have added photos of the Frog General, Frog Shaman and Frog Monster units. You can view them all in the Mighty Armies section here.

Man O War

This is a game that I always wanted to get into, but have had a really hard time finding any miniatures to get started. It seems I always get pipped at the post for most of the ebay auctions! πŸ™‚

Good proxies are not particularly easy to come by, but some people on the Sea of Claws Yahoo Group have done some outstanding scratch built ships. This is something that I would love to have a crack at one day, but am not confident… yet. πŸ™‚

I did find a company, Green Forest Trading Co, that sell some really cool Reptilian fleet and an Undead fleet. The Reptilian fleet are a little on the large size, but are still cool models. The Undead ones look fantastic and I will be getting a small fleet of them shortly. Models were never made for these two fleets, so for now, the other fleets can wait πŸ˜‰

I have painted up three Reptilian Battle Canoes and converted a Gargadon. The results are below.

The Gargadon was an easy conversion. All that was required was a plastic Skink model from Games Workshop’s Lizardmen army. I snipped the tail off and the body half way, just above the waist. Then I sanded down where the arms would normally glue on so that it looked rounded instead of flat.

I then glued it to a small flat 25mm round base and painted it.

I have designed some banners to attach to the ships ‘masts’ (I don’t think they are masts on these boats, but I don’t know the correct term), but haven’t attached them yet.

Look for more work on Man O War in the coming weeks! πŸ™‚

– Ben.


Finished Blood Bowl Dugouts

1 07 2008

I just finished painting my two Blood Bowl 7s Dugouts.

Here is a photo of one of them with my Frogfolk team waiting for the game to start. (Notice the Frogfolk Drummer at the top of the dugout showing that it is the Frogfolk’s dugout)

All I did was drybrush Raven Grey (British paints sample pot) followed by a drybrush of CB Windspray (British paints sample pot).

If anyone out there gives this a go, please let me know. I’d love to see the results! πŸ™‚

– Ben.

Enjoy.


Bloodbowl Dugouts and Preview of 28mm Turtle and Terrapin MA warband.

1 07 2008

Blood Bowl 7s Dugouts

Well, I finally got around to picking up some blue high density (HD) foam. In America, I believe it is very easy to find, but here in Australia, you can’t just go down to Bunnings and pick it up.

I ended up picking up some sheets of 12mm thick blue HD foam and a sheet of 50mm thick stuff (for some hills and crags I’ve been thinking of. For the 12mm thick sheet (roughly 600mm x 2550mm) it was about $28.95AUS, which I thought was pretty reasonable. The 50mm thick sheet was much more expensive at around $32ish for a half sheet (600mm x 1250mmish). I got these from Solid Solutions in East Bentleigh.

The blue HD foam is great and very easily sculpted into many things. The 12mm stuff was perfect for creating my Blood Bowl 7s dugouts, so I got to work carving and sculpting. This was my first shot at using the stuff and I found that my blade went dull very quickly.

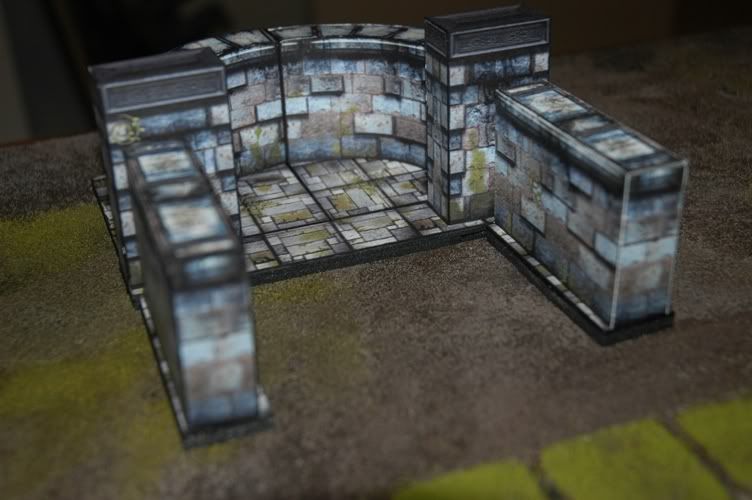
The foam was easy to cut and I quickly had a set of tiles that would act as the base for my dugout. I carved a little step into the front and then cut some 40mm long bricks to stack up as the wall.

To achieve some texture to the foam, I simply got a volcanic rock from outside and randomly pressed it into the foam. This has created a nice effect which should really show up in the drybrusing stage. (This idea was borrowed from a guy on another forum – Grungebob – thanks for the idea!)

I then constructed a sort of plinth that rose above the back of the dugout and carved a 25mm circle in the top. This is so I can place a model in there to show which team the dugout belongs to. It is also a simple way to customise the look of the dugout.

Once all the parts were cut out, I grabbed my hot glue gun (with low melt glue so that it didn’t melt the foam) and went about sticking it all together. In retrospect, I would undercoat the pieces before gluing next time, as I’m afraid that a few of the sections I can’t get paint to. With a varnish or sealer, these parts will end up bubbling… oh well hindsight is 20/20. πŸ™‚

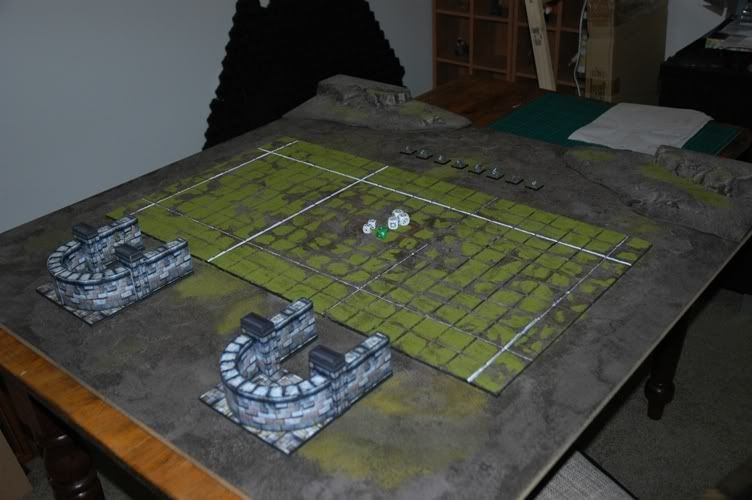
This is what it looked like when glued together:

Then I undercoated it with a black acrylic paint:

Next I will drybrush and add detail. But I’ll post that when I’ve done it. πŸ™‚ One step at a time.

Mighty Armies 28mm Terrapin and Turtle Preview

I have been playing Mighty Armies for a little while now and have really been enjoying it, but the armies that I want to play aren’t always catered for in the same scale (every wargamer’s been there – how many scales do you game in? πŸ˜‰ ).

At the moment I have armies in 10mm (Lord of the Rings), 15mm (Bat Clan Goblins – photos soon, Kobolds – in the process, and more on the way) and now I have started some armies in 28mm. I’ve done this because there isn’t a suitable number of Frog and Turtle miniatures at 15mm for me to viably create an army. Plus the look of some 28mm armies on a nice big 4’x4′ table will look awesome! I’ll post photos of the table when I get around to that!

So I ordered some bases from Litko Aerosystems. I went with 80mm frontages because there was a massive difference in the price (like over double) and 3mm thickness. This gives a nice solid base which has room for the 28mm minis. I plan to do a simple mini diorama for each base and have been investigating some basing pumice gel to landscape each base.

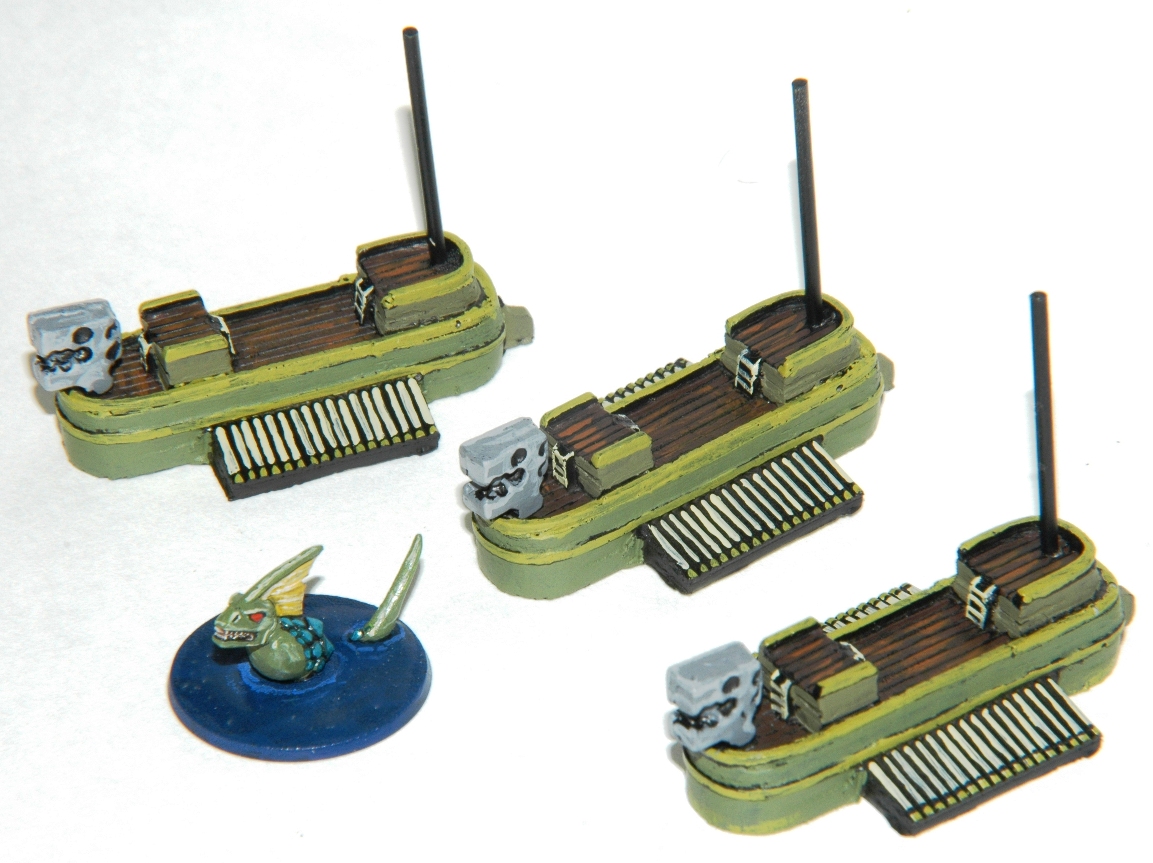
Well, the bases haven’t arrived yet, but I was eager to get started, so have painted up three bases of models already (they are just sitting on some stand in bases for the moment). I have painted up two Terrapin Spearmen bases and my Turtle General base.

Here is a preview photo of what I have done so far. More detailed photos (with better lighting and background etc… will be posted when I base them)

Anyway, I hope you find something here useful. Please feel free to comment, and make sure you come back and visit! πŸ™‚ I try to add stuff regularly.

– Ben.


Frogfolk Blitzers and update on Kaiju project

21 06 2008

Frogfolk Blitzers

Well I’ve finished painting my two Frogfolk Blitzers. One is based on darker coloured ‘Green Tree Frog’ and the other is based on the ‘Green and Golden Bell Frog’, an endangered frog here in Victoria, Australia.

I have also uploaded a better photo of my Frogfolk thrower. All of these are also added to my Blood Bowl link at the top of the blog.

Update on Kaiju Project

Well, after printing out a number of the road tiles and planning out some city blocks, I decided to stage a mock battle. To be honest, I was dissappointed at the washed out colours of the tiles against the full colours of the monsters and troops.

This seems to be an inherent problem when printing on cardstock using an inkjet printer. So I have started from scratch and will be printing the ground tiles (from the streets of mayhem set and the new hinterland set – which is awesome) on presentation paper (think 360dpi inkjet paper – 100 sheets for about $20) and then gluing them directly onto the board.

The buildings are a different issue and will require some experimentation. The options I see are:

  • Leave them as they are – this will keep the rigidity of the cardstock, but the colours will be lacking
  • Print them on inkjet paper, then glue that to cardstock – this will fix the colour and keep the rigidity, but will need some testing to ensure it works.
  • Print them on inkjet paper and then stick that to foamcore and create the buildings that way – much more sturdy, good colour, but more expensive and time consuming.

Needless to say, I will post samples up here when I decide what to do.

– Ben.


New photos of 10mm LoTR MA, Bloodbowl and SoBH

7 06 2008

Just a quick message to say I have updated the Mighty Armies, Blood Bowl and Song of Blades and Heroes pages on the blog with a slew of photos. Just click on the photo to enlarge it.

Please feel free to check them out.

– Ben.


Blood Bowl Magnetic Scoreboard

2 06 2008

I finished off my magnetic Blood Bowl 7s Scoreboard today. I’m really happy with how it turned out.

The materials used were things found very easily and cheaply. This is what you need to make it.

  • Paddlpop sticks
  • 2 Skewers
  • 2 Corks
  • 1 thin fridge magnet
  • Some foamcore
  • Small washers
  • PVA glue
  • Superglue
  • Paint

To start I chopped the skewers down to slightly longer than the desired height of the scoreboard. The sharp ends are smeared in PVA glue and stuck into the centre of the upright cork.

Once dry, simply glue the paddle pop sticks on to make the board section and then wait for it to dry.

Once dry, paint it up however you see fit. Cut up your fridge magnet so you get two small squares and glue them onto the scoreboard.

This is what it should look like:

Then all you need to do is create the score markers. These are made by cutting up small squares of foamcore and cutting cracks in them. Make sure these squares are larger than the magnet pieces you cut out.

Paint them up with the numbers on them and then superglue a small washer to the back of the number.

Once dry these will stick to the magnetic squares on your board.

Here is what the finished score markers look like:

The only problem with this scoreboard is that it makes the dugouts look very untextured and flat. The Worldworks Games (WWG) stuff is awesome, but I find it doesn’t mix well with scratchbuilt terrain. This means that I’m going to have to scratchbuild some dugouts to go on the board.

The WWG Chunky Dungeons that I have made can be put to good use when I build my DungeonBowl board later in the year.

I hope this was helpful. If you have any questions, please don’t hesitate to leave a comment.

– Ben.


Blood Bowl 7s Pitch in progress

29 05 2008

I have been working on a Blood Bowl 7s Pitch and board lately and have been really enjoying myself.

Here are the details:

The actual board is MDF 12mm x 1000mm x 1000mm bought from Bunnings

  1. I undercoated the board with black paint. I painted both sides to reduce any warping.
  2. I painted the board with a Brown texture paint. I was able to get a 500ml sample pot from Bunnings that was able to cover the whole table. I gave it three coats. This helped cover the black and give it some good texture.
  3. I used some Woodland Scenics light green flock to represent patches of grass.
  4. I sealed the board with White Knights Flat Varnish

The pitch is black foamcore bought from Riot Art

  1. I wanted to set the squares at 40mm each so that it could comfortably accomadate ‘Big Guys’ and prone normal players. So I lightly scored in the marks and then painted over the pitch with the same Brown texture paint.
  2. Once dry I used a ball point pen to heavily score (gouge) the lines to make them more noticable. This worked really well.
  3. I used PVA glue to stick down more light green flock on each square, being mindful of where the square was on the pitch.
  4. I painted the lines using a white acrylic paint.

The dugouts are from Worldworks Games Chunky Dungeons set

  • The front part of the dugout is for benched players, the back part of the dugout (with the stone floor) is for KO’d players and the dead and injured players… well, they’re dead and injured and don’t belong on the board, so there’s no spot for them.

The Turn Track is made from a simple square 25mm base with different plaster rocks (made from a Woodland Scenics mould). I have only put one set down so far and am not sure that I really need another set of them on there… might be too repetitive.

The Score Board, I have not done yet… not sure how to tackle that one yet.

Almost done πŸ™‚

Ben.